
Bravely Default seems like another RPG that follows the traditional formula: explore dungeon, get treasure, kill boss, rinse repeat. Once it gets its difficulty spike later in the game, you will be beaten from Monday to Sunday unless you know how to play. Luckily, there’s a way to be aptly prepared for the spike and for the rest of the game, especially against its bosses. With this guide and a good amount of time, you’ll be able to quickly grind, know the proper setup for opponent, and take down anything with much to moderate ease.
Mechanics
It is important to know how the game is played before going into the thick of things, so it wouldn’t hurt to get a quick refresher:
Brave: This shows for how many actions you can perform on a turn using Brave Points (BP). Each action a character takes cost 1 BP off their own count, and the more that is spent means they have more turns, and therefore more actions. The lowest your BP can go is -4, anything lower than that and they will “Not have enough BP!” for attacks costing BP. However, if your character is in the negative for BP they will have to skip turns until their BP resets to at least 0, making them a sitting duck for however long that takes.
Default: This is how you defend and is an action that always go first in any fight, no matter the speed of any person. By Defaulting, you not only take reduced damage from most attacks, but Defaulting costs no BP, and can be used for saving up BP. The most a character can save is 3 BP. Characters can still default, it just won’t save anymore BP.
Stats: Traditional things like HP, MP, Attack (affects physical attack), Defense (affects physical defense), Intelligence (affects offensive magic potency), Spirit (affects magic defense and potency of recovery magic), and Speed. Speed is an interesting stat because there are hidden values the player cannot manipulate. The game will not tell you this, but sometimes the game will either add or subtract numbers to a character’s speed stat, including enemies. They can be boosted by 10, or subtracted by 10, and there is nothing a player can do about how it is boosted or lowered. Because of this, even a character with the highest speed stat in the party could go third in the party.
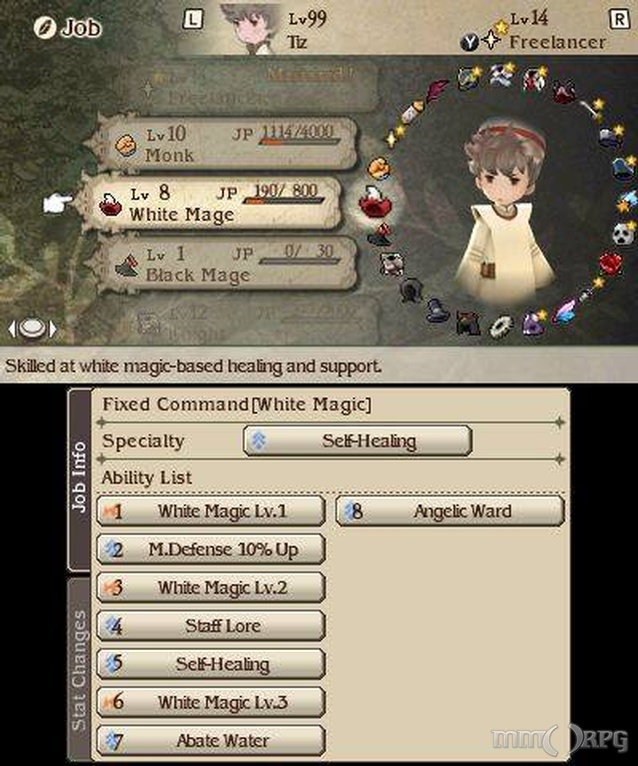 Jobs Jobs are roles that characters can use in combat for specific skills and stats, as well as how good a type of weapon can be used. Each have special abilities that can be equipped either as passive abilities or used as secondary job commands. Secondary job commands can make it so that a character can use two jobs at a time while having the stats of the first one (for example, a good combination would be an Agnes Spiritmaster with a White Mage as her secondary job, or an Edea Knight with a Spellfencer secondary job). Characters starts at Freelancers but get more jobs when certain enemies are defeated.
Points
Jobs get their own kind of EXP called JP, or “Job Points”, and each Job needs a certain amount of JP to level up, with the max level being at 14. At each level they gain a new skill, which either directly affects combat (such as Black Mage’s ‘Black Magic Lv. 2’ or Knight’s ‘Stomp’), or can be equipped and used with different jobs (such as White Mage’s ‘Abate Water’ or Dark Knight’s ‘See You in Hell’). They can be mixed and matched to make unique gameplay strategies, but if you’re reading this guide there’s a good chance you’ve run out of ideas.
Now that the general info is out of the way, it’s time to get into how to prepare for the strategy.
Battle
In battle, anyone can Brave or Default, and turns go about with the fastest character going first after Defaults. You can use job commands, normal attacks, or items, or run if you so desire. There are specific bonuses for how battles are fought. If you win in one turn, you get the “1-Turn Victor” bonus, which grants a boost in the EXP you get, winning without getting hurt will get you the “Unscathed” bonus, which gives a boost in the JP you get, and defeating every enemy at once will get you the “Sweeper” bonus, which grants a boost in the money you get.
There are three tiers to there bonuses: the normal bonus, the Ace bonus, earned by getting the same bonus five times in a row, and the Hero bonus, earned by getting the same bonus ten times in a row. Once you reach Hero, you will get the Hero bonus until something happens to mess up the chain (not clearing in one turn, and getting hurt).
Norende Mini-Game
 There is also a Norende mini-game that can be played to get some really good weapons and items, and if diligently played with it can give you some very good weapons and armor near the start of the game.
You play by passing people via streetpass (or online). Those people become villagers, and you can use them to build shops that give items, weapons, armor, special attack boosts, and more, which can be bought from the Adventurer (the guy in red who acts like a save point). The amount of time it takes to get a shop depends on the amount of people working. For example, a shop would take an hour to build with one villager. If there are two villagers, it goes down to 30, and 15 for 3 people, and so on. You can level us buildings until they reach level 11, where they can’t grow anymore. Buildings can be built even while the game is in sleep mode. The best way to do this is to set your workers, close your DS, and do something else.
While this is optional for the official guide, it is a very good idea to get these going and your armor gotten, especially the shops that can enhance special attacks. Outside of this guide, you may find them rather good.
Setup
The difficulty spike comes at Chapter 5, and the best time to start preparing  would be in Chapter 4, sometime after getting the Templar job. Once you’re at that point, your best place to grind is outside of Eternia during the daytime.
You will need:
Once you have the necessities, it is time to grind. You’ll want to start outside of Eternia. To effectively grind, put the Valkyrie job as your secondary Job command, and switch your primary job to whatever needs levelling. Turn your game encounter rate to 100% and begin running around until you hit a battle. Have each character Brave as much as they can, and use the Valkyrie ability Crescent Moon. Then press the ‘Y’ button to turn the game on Auto mode, which will make it so that your characters will automatically use the last commands used by itself. Once you win, continue to run around until your job reaches to level 14. Then you switch jobs and repeat.
Why am I doing this?
This is good to reduce the amount of Jobs to work with and give you a wider range to work with. Not only that, but the Freelancer Job have a unique ability called ‘Late Bloomer’, which means that the Freelancer Job gains a 1% boost in all stats for every Job mastered for that character. Since there are 24 jobs in the game, each character can gain a 24% boost in their stats as a freelancer, turning it from one of the weakest jobs to one of the strongest, and because the Freelancer Job has the highly coveted and highly exploitable ability ‘Mimic’ that is learned at level 14, which means that the character mimics the last action a character made without making it cost any HP, MP, pg, BP required to use the move or items.
Okay, everything right now is at level 14, now what?
Now you can proceed to finish Chapter 4. When you are in Chapter 5, go to Florem and do the exact same thing, only this time you only need to grind with the Dark Knight job. You should now have access to ‘See You in Hell’, an ability where if a character is killed they will deal four times the amount of a regular attack on the entire enemy party (learned at level 5), and Dark Nebula, an attack that sacrifices HP to unleash a dark type attack that deals four times the damage to all enemies (learned at level 11). If you do not want to play with risks, you can substitute it for the Pirate’s Amped Strike ability, which will deal roughly the same amount of damage, but only on one enemy and will cost an obscene amount of MP to use.
You should also have your Spiritmaster at level 14. Spiritmasters learn the skill Adaptation, which will make an ally absorb all elements for four turns. Spiritmasters with this ability are a Dark Knight’s best friend.
You’re now ready to fight now!
 For my battles, I equipped everyone with the See You in Hell ability. I made everyone a Freelancer, and gave Tiz Dark Knight abilities, Agnes White Mage abilities, Ringabel Pirate abilities (in case things go wrong), and made Edea my Spiritmaster. I’d try to make her my fastest member (but as said above it doesn’t work all that well sometimes), and have her cast adaptation on everyone, while everyone else defaults. Then I use a turn to have Tiz use Dark Nebula and have Agnes and Ringabel default one more time. Then I have the rest of the party brave as much as they can and spam the heck out of Mimic. It not only does ridiculous damage to the enemy party, but you and your entire team gets healed an obscene amount of health (to make up for taking a beating setting things up).
If you want, you could have everyone do all this on the same turn, but it is very risky. You could have members using adaptation over and over again or, in a worse case scenario, use Dark Nebula before Adaptation is set up, and if other party members mimic you effectively killing yourself. But the output is worth the risk when you get the hang of things.