Fire Emblem Heroes is a game that offers bite sized-Fire Emblem experiences in your mobile devices and tablets. Ever since its release, the difficulty curve flattened almost completely for early adopters of the game thanks to the constant supply of Orbs and units as well as new mechanics that were introduced over the months. That changed until version 1.4.0 introduced a new game mode: Tempest Trials
You have to clear a set number of maps while being limited to 4 teams at max. Any defeated allies will retreat and cannot be used until you finish the run, lose or surrender. Completing a run will a award you a certain amount of points which are determined by 5 factors: difficulty, number of maps cleared, survival, speed and whether or not you included a bonus unit in your team.
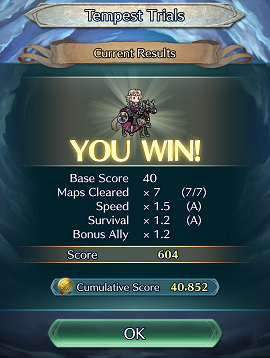
This is the base value of points you receive per map cleared. All Tempest Trial runs cost the same amount of Stamina points to play (20). You get more points per map from higher difficulties.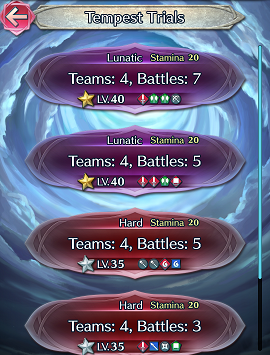
This variable is determined by how many teams you required to complete the challenge. You get a x1.2 multiplier for winning with a single team. It’ll go down by 0.05 for every team you lose, going to a minimum of x1 for a total wipe-out.
This refers to the total amount of turns it takes you to complete the entire challenge. This is perhaps the most important multiplier after difficulty since the boost it gives can be very significant. You’re ranked from A to E:
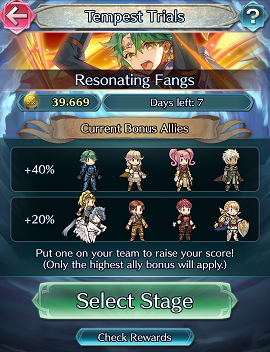
Bonus Heroes for the Resonating Fangs Tempest Trials
It’s a bonus of 20% to 40% points that is awarding for including a particular Hero in your team. 40% Heroes are usually obtained exclusively through summoning, while 20% Heroes can be obtained through free to play methods or are common summons. Tempest Trials are accompanied by a dedicated summoning banner that includes the 40% bonus Heroes as well.
It’s important to note that Alfonse, Sharena and Anna, the 3 starting Heroes, always give a 20% bonus. It’s worth investing in them for the cases when you don’t own any of the bonus Heroes and can’t or don’t want to summon from the dedicated summoning banner.
Aim for those exclusive rewards!
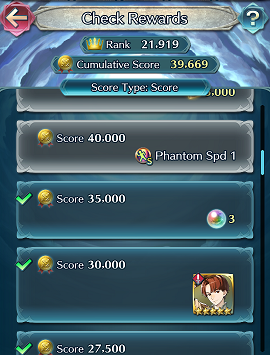
Clearing the hardest difficulty is over 3 times faster than the easiest, which is key when it comes to this mode. Rewards are given out depending on how many points you’ve accumulated. Noteworthy rewards are Sacred Seals to equip to your units, as well as 2 copies of a free Hero: one being 4★ and the other 5★. So how can you about clearing those higher difficulties? That’s why I’m here to help!
This perhaps the single most important tip. Your units aren’t healed between maps, which means that if your entire team is left severely wounded, well tough luck kiddo. There are a few ways to recover or maintain your HP though. Of course, you can also try to run a hyper-offensive team and try to avoid being hit entirely as well.
Before Tempest Trials Healers were kind of useless, taking a valuable spot that another kind of support unit could fill. This is because most maps are too short for your units to take mortal damage if you know what you’re doing and the fact that the damage staves deal is halved.
Surviving 7 maps in a row is another story, and the simplest way to recover HP is with these clerics. I suggest you use Recover or Rehabilitate staves combined with the Imbue Special Skill. They heal the most HP possible. You want to keep your healers out of harm’s way, so you should stick them in the back lines. Equipping them with Spur or Hone skills is very useful, since they can come in, heal, and buff your allies for your next turn.
Don’t like to use dedicated healers? Well, this is a nice middle ground. Passive healers are non-staff units that are able to recover allies’ HP through Assist or Passive skills while being able to regenerate their own without help. They’re not as effective but get the job done.
They’re usually equipped with the B Passive skill of Renewal, since it’s the easiest way to recover HP independently. Other ways include using the Noontime, Sol or Aether Special skills. This particular combination works by using the Assist skills Reciprocal Aid or Ardent Sacrifice on allies. The former exchanges the HP between both units (without going over their max HP), while the latter removes 10 HP from the user and gives them to the target. These skills are also useful for triggering passive skills such as Vantage, Brash Assault and Desperation. Falchion users are well suited for this role since their weapon has Renewal 2 built in, which stacks with the actual skill to recover 20 HP over the course of 3 turns.
Another more indirect way is by using the passive C skill or Breath of Life. It’ll heal 7 HP to adjacent allies when the unit wielding it initiates an attack. This effect can be stacked with the Breath of Life Sacred Seal to heal 10 HP. Linde’s signature tome, Aura, also stacks with both of these for a potential 15 HP.
Basically take the special and passive skills you’d give to passive healers and stick them on your main units. The best skills for this are Aether and Renewal. The former is rather hard to get and exclusive to 5★ units, so inheriting them isn’t very wise unless you own multiple copies of Heroes that know the skill. The latter is much more preferred, as it’s available from 4★ Fae and Boey, and it always activates when you begin a new map, and healing your units by 10 HP every other turn (assuming Renewal 3).
Having a few more points in your stats, or being able to move a certain unit twice in a turn can really make the difference. In Fire Emblem Heroes there’s 3 types of support units: Healers (which I already talked about), Buffers and Dancers.
Buffers, as their name imply, are units dedicated to buff the stats of their allies. Usually through Hone and Fortify boosts though Spurs can be used as well, they’re just a bit trickier to pull off since they need more tactical positioning. They also like to have a Rally for a stat that their passives don’t cover. Some people prefer having positioning Assists instead. It’s up to your playstyle. These units are most effective when run alongside Bladetome users because of the explosive results.
Dancers are units that have the exclusive assist skills Dance and Sing, which allow targeted allies to move again in the same turn. This is an extremely useful ability, since it can allow you to make more aggressive plays to defeat maps faster, or retreat from a sticky situation.
Not just any skills though, I’m talking about Draw Back, Reposition and Swap. Shove and Smite have their uses, but they’re nowhere near as effective. Pivot is used pretty much exclusively on armored units to make up for their poor movement.
Draw Back allows you to move the selected unit back by 1 space. You have to make sure the units are able to stand in the tile though. For example, you cannot use Draw Back on a Cavalry unit if there’s a forest in the way, neither you can use it to make non-flier units to stand on ocean, lava or crater tiles.
Reposition and Swap serve more or less the same roles. The first is to move your targeted unit out of the enemies’ range, while functioning as a meat shield to tank a hit. The second is to give more mobility to your offensive units when you’re 1 or 2 spaces too far from the enemy.
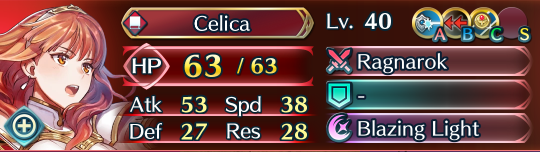
A Celica with inflated stats
Enemies in Tempest Trials start off having regular stats. However, as you advance their stats will be inflated, going beyond what is normally achievable.
It’s recommended to have at least 1 “nuke” unit. They either have high Attack and Speed with poor defenses, or extremely high Attack with average stats all around.
You must build a team that is able to cover as many matchups as possible. This means you must use the weapon triangle to your advantage. You don’t necessarily need to run 1 Green, 1 Red and 1 Blue unit though. I’ll give my team as an example:
I’m currently using Reinhardt (Blue Tome), Xander (Red Sword), Sharena (Blue Lance, buffer) and Elise (Colorless healer), no greens anywhere. Reinhardt’s massive Attack stat and support from Sharena and Elise, allows him to beat most reds and blues. Xander is there to cover his weakness to Greens, Bows and Daggers, giving me total control over the weapon triangle.
Aim for the highest score!
This refers to a group of units that synergize well together. There are different types of cores, but the most popular are Cavalry and Flier cores. There’s also some others such as 2 Bladetome users + a buffer and a dancer, or tank cores that consist of units with above average defenses that boost each other with skills while being supported by a healer.
I’ll use my own team again as an example. I’m using a cavalry core that consists of Xander, Reinhardt and Elise. Xander is equipped with Fortify Cavalry to help with the others’ survival, while both Elise and Reinhardt have Goad Cavalry, giving Xander +8 Attack and Speed when they’re within 2 spaces of him. This ensures that Xander cannot be doubled by the majority of the units I come across, and he’ll almost always double the opponent thanks to Quick Riposte and Elise’s healing. The last slot is dedicated to having a bonus ally, which is why I have Sharena.
Well, I hope this guide’s got your brain thinking! Go build up your strategies and beat those Tempest Trials, aim for that 99,999+ goal! I’ve done it before by following my own advice.